Follow Me On Social Media!


Jelly toys with chocolate-coated berries
Jelly Toys with Chocolate-Coated Berries: A Fun Delight for Everyone
Hey there, sweet seekers! Are you ready to dive into a whimsical world of flavor and creativity? Today, we’re whipping up something that’s not just a treat for the taste buds but also an absolute joy to behold—Jelly Toys with Chocolate-Coated Berries! Whether you’re looking to entertain the kiddos or impress your friends at a gathering, this recipe is a fantastic way to sprinkle a bit of fun and elegance onto any table. Let’s get to it!
Why You’ll Love Jelly Toys with Chocolate-Coated Berries
There’s something undeniably nostalgic about jelly, isn’t there? It takes us back to our childhood days—imagine running around with sticky hands after indulging in a rainbow of flavors! Adding chocolate-coated berries not only ramps up the fun factor but also gives your taste buds a delightful surprise. It’s the perfect balance of sweet and slightly tart, and bonus points for being visually stunning! Trust me, these will be the star of any dessert spread.
What You’ll Need
Let’s gather our ingredients for this delightful endeavor! Here’s what you’ll need for our Jelly Toys with Chocolate-Coated Berries:
Ingredients:
- 2 cups fruit juice (your choice, but berry or tropical works wonders)
- 2 tablespoons gelatin powder
- 1 cup fresh berries (strawberries, blueberries, or raspberries)
- 1 cup chocolate chips (dark or milk, depending on your preference)
- Optional: colorful sprinkles for a fun finishing touch
Get Started with Jelly Toys
Now that we’ve got our ingredients lined up, let’s jump into the fun part—making our jelly toys!
-
Prepare Your Jelly Mixture: In a saucepan over medium heat, gently warm the fruit juice until it’s hot but not boiling. Remove from heat and stir in the gelatin powder until dissolved. It’s like magic watching it turn into a luscious liquid!
-
Mold the Jelly: Pour the jelly mixture into fun, shaped molds. You can use those adorable silicone molds shaped like stars, hearts, or even dinosaurs! Set aside in the fridge for about 2-3 hours until they’re perfectly set. (This is a great time to catch up on that show you’ve been bingeing!)
-
Coat Your Berries: While the jelly cools, melt the chocolate chips in a microwave-safe bowl or over a double boiler. If you’re using a microwave, do so in 30-second intervals, stirring in between to avoid any chocolate mishaps. Once melted, dip your fresh berries into the chocolate, coating them well. Let any excess chocolate drip off and place them on a baking sheet lined with parchment paper.
-
Sprinkle Some Fun: Before the chocolate sets, feel free to sprinkle on some colorful sprinkles for that extra pizzazz!
-
Assemble Your Treats: Once your jelly has set, carefully remove them from the molds and playfully arrange them on a plate alongside your chocolate-coated berries. Trust me, their vibrant hues will have everyone oohing and aahing!
Cooking Tips
- Choose Your Juice Wisely: For the best flavor, go for 100% juice without added sugars. It makes a big difference!
- Play with Shapes: Don’t have fancy molds? No problem! Just pour the jelly into a regular dish and cut it into cubes later.
- Leftover Chocolate? Melt it down to drizzle over popcorn or pretzels—nothing goes to waste in our kitchen!
Personal Anecdote
I can still remember the first time my sister Patricia and I made jelly shapes for our family picnic. We were so proud, and our cousins could not stop giggling at the silly shapes we’d created! That day reminded me that cooking should be fun and sometimes a little messy. These jelly toys carry that same spirit of joy, and I hope they bring smiles to your family, too.
FAQs
Can I change the type of juice?
Absolutely! Just about any juice will work. I love experimenting with different flavors, so go wild!
How do I store leftovers?
Keep any leftovers in an airtight container in the fridge for up to three days—if they last that long!
Can I use frozen berries instead?
Yes! Just be sure to thaw them and pat them dry before dipping them in chocolate.
Wrapping It Up (or Should I Say, Jelling It Up?)
So there you have it! Jelly Toys with Chocolate-Coated Berries are not just a delicious treat but a canvas for your creativity, guaranteed to spark joy at any gathering! The best part? They’re quick and easy to make, which means less time in the kitchen and more time enjoying with your friends and family.
Now, the only thing left to do is grab your apron and start creating your edible masterpieces. Happy cooking, friends! Don’t forget to check out some of my other delightful recipes, like Easy Chocolate Mousse or No-Bake Cheesecake Cupcakes. Trust me, they’re just as fun and delicious!
Meta Description: Jelly Toys with Chocolate-Coated Berries is the perfect recipe for a fun treat. Quick, easy, and delicious, this dessert will bring smiles!
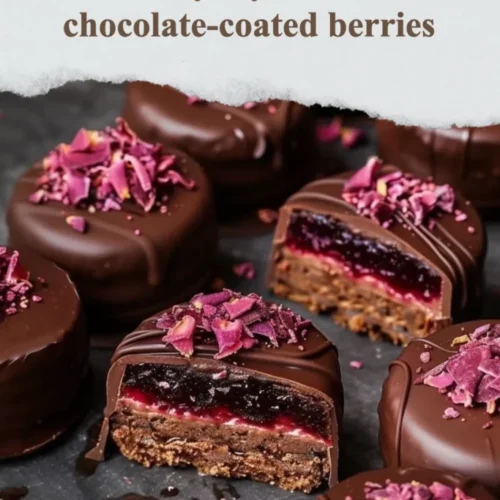
Jelly Toys with Chocolate-Coated Berries
A whimsical and delightful treat combining jelly toys with chocolate-coated berries, perfect for entertaining friends and family.
Ingredients
Jelly Mixture
- 2 cups fruit juice (your choice, but berry or tropical works wonders) Choose 100% juice without added sugars for the best flavor.
- 2 tablespoons gelatin powder
Chocolate-Coated Berries
- 1 cup fresh berries (strawberries, blueberries, or raspberries) Frozen berries can be used if thawed and dried.
- 1 cup chocolate chips (dark or milk, depending on your preference) Melt in microwave-safe bowl or double boiler.
- to taste colorful sprinkles Optional for decoration.
Instructions
Preparation of Jelly Mixture
- In a saucepan over medium heat, gently warm the fruit juice until it’s hot but not boiling.
- Remove from heat and stir in the gelatin powder until dissolved.
Molding Jelly
- Pour the jelly mixture into fun, shaped molds.
- Set aside in the fridge for about 2-3 hours until perfectly set.
Coating Berries
- Melt the chocolate chips in a microwave-safe bowl or over a double boiler, stirring in between.
- Dip the fresh berries into the melted chocolate, coating them well.
- Let any excess chocolate drip off and place them on a baking sheet lined with parchment paper.
Finishing Touches
- Before the chocolate sets, sprinkle on some colorful sprinkles for an extra touch.
Assembling Treats
- Once the jelly has set, carefully remove them from the molds and arrange on a plate alongside the chocolate-coated berries.
Notes
Cooking Tips: Use various juice flavors for creativity. If you don't have molds, pour jelly into a regular dish and cut into cubes later. Leftover melted chocolate can be used creatively.